
You have the drop on an opponent. You line up for the critical first shot, but your hand tenses, your wrist angle feels “off,” and your aim falters. You die. You blame your mouse, but the real culprit is your chair. It sounds crazy, but it’s true. Your ergonomic setup is the hidden foundation for all your clicking performance. We’re taught to think ergonomics is just about “comfort” or preventing wrist pain. The truth is, it’s a science of peak performance, and a bad setup is a bottleneck that no high-end mouse can fix.
Executive Summary: Your Blueprint for Higher CPS
Stop letting your setup sabotage your skill. This guide provides a simple 5-step blueprint to optimize your entire gaming station, from your chair’s wheels to your monitor’s height. We won’t just talk about comfort; we will show you exactly how to find the “neutral positions” that directly reduce fatigue reduction, improve fine motor skills, and unlock your true potential for consistency, accuracy, and raw Clicks Per Second (CPS). This is how you build a setup that works with you, not against you.
Why “Comfort” is the Wrong Goal: Ergonomics = The Science of Performance
The biggest mistake players make is thinking ergonomics is just about feeling “comfy.” Comfort is a result of a good setup, but the goal is efficiency. A proper ergonomic setup removes all points of physical resistance, allowing your body to work as a single, optimized machine. This is how you unlock speed and consistency.
The Kinetic Chain: How Your Chair Height Affects Your Fingertips

Your body is a “kinetic chain.” No part moves in isolation. If your chair is too low, your knees go up. To compensate, your pelvis tilts back. To see the screen, you hunch your shoulders forward. This hunch tenses your shoulder, which travels down your arm, creates forearm strain, and puts your wrist in a weak, angled position. Your clicking performance was just ruined by your chair, not your hand. The goal of ergonomics is to align this entire chain perfectly.
Stop Fighting Your Body: What is a “Neutral Position”?
A “neutral position” is the posture where your joints are at their most relaxed and efficient.
- Neutral Wrist Position: Your wrist is straight, not bent up, down, or to the side. This is where your tendons have the least friction and your muscles have the most control.
- Neutral Elbow: Your arm forms a 90-degree angle, allowing blood to flow freely and muscles to stay relaxed.
Every moment you spend away from a neutral position, your muscles are fighting gravity and tension. That’s energy you could be using for precise fine motor skills and rapid clicks.
The Enemy: Repetitive Strain Injury (RSI) and What It’s Costing Your CPS
When you force your body to work in a bad position for long gaming sessions, you get Repetitive Strain Injury (RSI). This isn’t just a future health problem; it’s an immediate performance killer.
- Hand Strain and Wrist Pain are the first signs.
- That pain is your body’s check-engine light, telling you it’s inflamed.
- An inflamed muscle is a slow and weak muscle. It reduces your gaming endurance, kills your consistency, and lowers your Clicks Per Second (CPS) long before you feel any actual pain.
Proper ergonomics is your first line of defense, ensuring you can play at your peak. Another critical step is performing regular hand and wrist exercises to prevent injury and keep those muscles healthy.
Step 1: The Foundation (Your Chair & Posture)

Your peak performance starts from the ground up. You cannot have a stable, fast hand if your core is unstable. Your gaming chair isn’t just a seat; it’s the foundation of your entire gaming station and the first step to aligning your kinetic chain for high clicking performance.
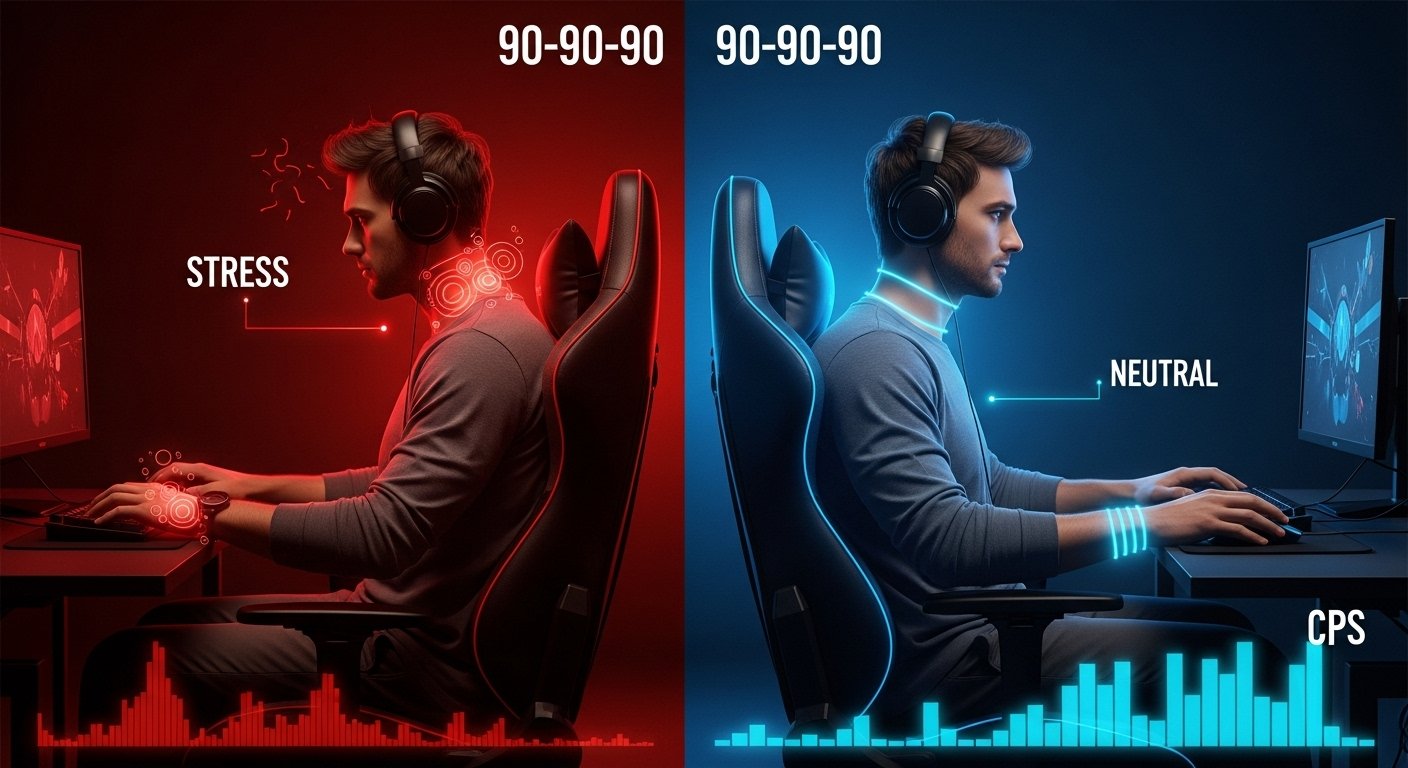
Finding Your “90-90-90” Seated Position (Feet, Knees, Hips)
The goal is to let your skeleton, not your muscles, support your body. The “90-90-90” rule is your starting point.
- Feet (90 Degrees): Sit with your feet flat on the floor. If they dangle, use a footrest. Your shins and thighs should form a 90-degree angle. This grounds you.
- Knees (90 Degrees): Your thighs should be parallel to the floor. Adjust your chair height up or down until you achieve this.
- Hips (90 Degrees): Your torso should be upright, forming a 90-degree angle with your thighs.
This posture creates a stable base, which is the first step to taking the strain off your upper body.
Why Lumbar Support Isn’t Just for “Old People” (A Stable Core for a Stable Aim)
That curve in your gaming chair’s backrest is its most important feature. Your lower spine (the lumbar region) has a natural inward curve. Lumbar support (that pillow or built-in curve) is designed to fill this gap.
When you slouch, your core muscles disengage. Your body becomes a soft, wobbly foundation, and your arm has to work harder to stabilize your aim. Proper lumbar support keeps your spine in its neutral position, which keeps your core engaged and stable. A stable core is the anchor for a steady, precise arm.
The Most Overlooked Setting: Adjusting Your Armrests to Desk Height
This is the single most important adjustment for your clicking performance, and 99% of players get it wrong.
Your armrests MUST be adjusted to be perfectly level with the top of your desk.
- If they’re too low: Your shoulders will slump, and you’ll be forced to rest your wrist on the hard edge of the desk, creating a nasty pressure point that leads to wrist pain and blocks fine motor skills.
- If they’re too high: They’ll force your shoulders to shrug, creating tension in your neck and shoulders that radiates all the way down to your arm, causing fatigue reduction in your clicking.
When your armrests are level with your desk, you create one large, seamless, supportive surface for your entire forearm. This is the key that unlocks the next step.
Step 2: The Platform (Your Desk & Arm Position)

With your chair and armrests forming a single, level surface with your desk height, you can now perfect the position of your arm. This step is where you eliminate the tension that kills your clicking performance and leads to forearm strain.
This is Critical: Achieving a Perfect 90-Degree Arm Angle
Your elbow is the pivot point for your clicking and aiming. Its position is everything.
- Your Goal: When resting your arm on the armrest/desk, your elbow should naturally fall into a 90-degree angle (or slightly more open, like 95-100 degrees).
- Why it Matters: This arm angle is the most relaxed position for your bicep and forearm.
- If your angle is too tight (less than 90), your muscles are constantly flexed, which leads to rapid fatigue.
- If your angle is too wide (your arm is too straight), you lose leverage and fine motor control, forcing you to use your whole shoulder for small movements. This 90-degree position keeps your muscles relaxed but ready, providing the perfect balance of stability and reaction time.
The Neutral Wrist Position: The Secret to Preventing Wrist Pain and Unlocking Accuracy
This is the most important secret of injury prevention and accuracy. A neutral wrist position means your wrist is straight, not bent.
- DON’T: Rest the heel of your wrist on the desk and bend your hand up to hold the mouse. This creates a painful pressure point and pinches the nerves in your carpal tunnel.
- DO: Let your entire forearm rest on your armrest and desk. Your hand should “float” over the mouse or rest gently on it, continuing the straight line from your elbow, through your forearm, and out to your knuckles.
When your wrist is straight, your tendons can move freely. This gives you maximum control over your fine motor skills for precise aiming and rapid clicking. A bent wrist is a slow, pained, and inaccurate wrist.
Case Study: How I Gained 2 CPS by Fixing My Arm Position
For years, I was a “wrist aimer” who had chronic wrist pain. I rested the heel of my wrist on the desk and used a high DPI, flicking the mouse with just my fingers. My average CPS was stuck at around 6. I thought I just had slow hands.
Then, I learned about the neutral wrist position. I lowered my chair, raised my armrests to match my desk, and forced myself to rest my entire forearm on the surface. It felt bizarre at first. But with my wrist straight, the pain vanished in days. More shockingly, my clicking performance jumped. With the tension gone, my fingers were more relaxed and faster. I went from a 6 CPS average to a consistent 8 CPS just by changing my arm posture. It was a lesson I never forgot.
Step 3: The Control Center (Mouse & Keyboard Placement)

Your arm and wrist are now in a perfect, neutral position. The final step is to place your mouse and keyboard in a way that maintains this strong posture, allowing your hand and fingers to do their job without introducing new tension.
Why Your Mouse Grip (Palm, Claw, Fingertip) Dictates Your Mouse Position
How you hold your mouse—your mouse grip—is the final piece of the ergonomic puzzle. Your setup needs to support your grip style, not fight it.
- Palm Grip: You need the most support. Your forearm-on-the-desk setup is perfect, as it allows your entire palm to rest on the mouse while your arm remains stable.
- Claw & Fingertip Grip: These grips require more wrist and finger movement. You must be extra careful to keep your wrist straight and elevated off the desk (a “floating wrist”). Your forearm support is what gives you the stable pivot point to make these fine motor skills possible without straining your wrist.
Understanding the best mouse grip for max CPS is crucial, as a good grip combined with a bad posture will always lead to failure.
Free Your Arm: How Keyboard Placement Can Ruin Your Mouse Hand
This is a simple but critical mistake. Most people center their keyboard on their monitor. This forces your mouse hand to be splayed far out to the right, putting your shoulder in a strained, unnatural position.
The Fix: Your keyboard should be positioned based on your gaming keys, not the center of the keyboard.
- Place your WASD (or relevant) keys directly in front of your left shoulder.
- This shifts the entire keyboard to the left, which opens up a massive, valuable area directly in front of your right shoulder.
- This “mouse zone” allows your mouse hand to sit in a perfectly straight, neutral line from your elbow, eliminating all shoulder and arm strain. Tenkeyless (TKL) or 60% keyboards are fantastic for this, as they give you even more space.
The “Arm vs. Wrist” Aiming Debate (And How Your Setup Chooses for You)
You’ve heard this debate in competitive gaming: should you aim with your arm (low DPI) or your wrist (high DPI)? The truth is, your ergonomic setup has already made this choice for you.
- A Bad Setup (wrist bent, arm unsupported) forces you to be a wrist aimer. You have no other choice, and it leads to inconsistency and hand strain.
- An Optimized Setup (forearm supported, wrist neutral) unlocks your ability to be an arm aimer. You can now use your stable elbow as a pivot for large, consistent movements (arm aiming) and your relaxed fingers for micro-adjustments (finger aiming).
This combination of arm aiming for tracking and finger/wrist aiming for flicks is the key to high-level accuracy and is only possible with a proper ergonomic foundation.
Step 4: The Feedback Loop (Monitor Position)

Your body is now a stable, optimized platform. The final step is to position your monitor so your brain can receive visual information as quickly and accurately as possible. This is your feedback loop. If your monitor is in the wrong place, you create a delay between what your eyes see and what your hands do, killing your reaction time.
The “Top of Screen at Eye Level” Rule
This is the golden rule of monitor position. It’s not just for comfort; it’s for performance.
- The Rule: Sit in your perfect “90-90-90” posture. Your eyes should be level with the top 1/3 of your monitor screen. The center of the screen will be slightly below your gaze.
- Why it Matters:
- Too High: If you have to tilt your head up to see, you’re straining your neck and slowing your eye movement.
- Too Low: If you have to hunch down, you’ve just broken the entire ergonomic chain you built. Your shoulders slump, your core disengages, and your arm posture is ruined.
This eye-level position keeps your neck and spine neutral, allowing your eyes to scan the screen with maximum speed and minimal effort.
One Arm’s Length: Finding the Perfect Monitor Distance
How far away should your monitor be? The answer is simple and requires no measuring tape.
The Test: Sit in your optimized posture and extend your arm straight out in front of you. Your fingertips should be able to comfortably touch the surface of your screen.
- If it’s too close: Your eyes have to work too hard to focus and track movement across the screen, leading to eye strain and slower reaction time.
- If it’s too far: You’ll have to lean forward and squint to see details (like a distant enemy), which, once again, breaks your posture and ruins your foundation.
This “arm’s length” rule keeps the monitor at the perfect focal distance, ensuring your hand-eye coordination has a clear and easy target to lock onto.
How Monitor Height Directly Impacts Your Hand-Eye Coordination and Reaction Time
This is how it all connects. Hand-eye coordination is a loop: Your eyes see a target, your brain processes it, and your hand reacts by moving the mouse. A bad monitor position introduces lag into this loop.
If your monitor is too high or too low, your brain has to perform a tiny, subconscious calculation every single time to adjust for the bad angle. This is a form of low latency in your own body.
By placing your monitor at eye level and arm’s length, you create the most direct, 1-to-1 connection between your eyes, your brain, and your hand. You see the target, and your hand reacts instantly, with no postural “lag” getting in the way. This is the final piece of the performance optimization puzzle.
Step 5: Tying It All Together (The Optimized Workspace)

You’ve built your gaming station from the foundation up. Each step, from your chair to your monitor, is now aligned. This final step is about making this new setup sustainable and understanding the profound impact it will have on your clicking performance.
The Test: Can You Maintain This Posture for 30 Minutes?
You have your “90-90-90” posture, your neutral wrist, and your monitor at eye level. Now, test it. Sit in this position for a 30-minute gaming session.
- It might feel “weird”: This is normal. You are un-learning years of bad habits. “Weird” is fine.
- It should not feel “painful”: If you feel new aches or strains, something is wrong. Your body is telling you a “neutral” position hasn’t been achieved. Re-check your chair height and armrest adjustment.
A true ergonomic setup is one you can maintain for long gaming sessions without thinking about it. It should feel effortless.
Micro-Breaks: The Key to Long Gaming Sessions and Sustained Performance
Even a perfect setup can’t beat biology. Sitting for hours on end, performing repetitive motions, will always cause fatigue. The key to gaming endurance is proactive rest.
- The 5-Minute-Per-Hour Rule: For every hour you play, stand up for five minutes. Walk around, get some water, and get off your chair.
- Stretch Your Hands: Your hands are doing the most work. In between rounds or during loading screens, take 30 seconds to do simple hand and wrist stretches. This keeps the blood flowing and prevents the hand strain that kills your CPS.
Comparison Table: Bad Setup vs. Optimized Setup (The Performance Impact)
This is the real-world difference your new setup makes.
| Performance Metric | Bad Setup (Slouched, Tense) | Optimized Setup (Neutral, Supported) |
| Clicking Speed (CPS) | Inconsistent. High burst speed but rapid fatigue. Low average CPS over time. | Consistent. Your burst speed is unchanged, but your average CPS is much higher. |
| Accuracy / Aim | Poor. Tension in your arm and wrist leads to jittery, jerky aim. | High. A relaxed arm and neutral wrist allow for smooth tracking and precise micro-adjustments. |
| Endurance | Very Low. Wrist and forearm pain force you to stop or play poorly after 30-60 minutes. | Very High. You can play for hours at your peak, as your muscles are relaxed and supported. |
| Injury Risk | Extremely High. A direct path to Repetitive Strain Injury (RSI) and Carpal Tunnel. | Extremely Low. You are in a position designed for long-term health and sustainability. |
Frequently Asked Questions (FAQ)
Will this really make me click faster?
What’s more important: my chair or my desk?
How do I set this up if I have a standing desk?
Does mouse and keyboard size matter for ergonomics?
How often should I take a break to prevent injury?
Conclusion:
Your gaming station is a performance tool, not just a collection of accessories. We’ve proven that a $20 mouse in a fully optimized ergonomic setup will consistently outperform a $150 mouse in a bad one. Stop letting your setup be the bottleneck that costs you fights. You don’t need to “buy” your way to better performance.
Start by fixing your foundation. Use this 5-step blueprint to build a setup that supports your skill, eliminates your pain, and finally unlocks the peak performance that your tense, unsupported body has been holding back. Stop fighting your gear and build a foundation that lets you win.
Now that you have the blueprint, which step do you think will make the biggest difference in your own setup? Share your “before and after” in the comments below!

Hello, I’m John Harbour, a software developer passionate about creating innovative and accessible AI tools. As the creator of cps-checker.com, I enjoy building useful software and writing blogs to help people get the most out of my creations.